快速入门
从一个简单的管道示例开始
在本教程中,您将学习如何安装 RDI 并设置管道以将实时数据从 PostgreSQL 数据库提取到 Redis 数据库。
先决条件
- 将用作管道目标的 Redis Enterprise 数据库。将摄取的数据集为 大小非常小,因此单个分片数据库应该就足够了。RDI 还需要维护其 自己的数据库来存储状态信息。这需要 Redis Enterprise v6.4 或更高版本。
- Redis Insight 用于编辑您的管道
- 具有以下作系统之一的虚拟机 (VM):
- Ubuntu 20.04、22.04 或 24.04
- RHEL 8 或 9
概述
下图显示了我们将创建的管道的结构(请参阅 架构概述,了解管道的工作原理):
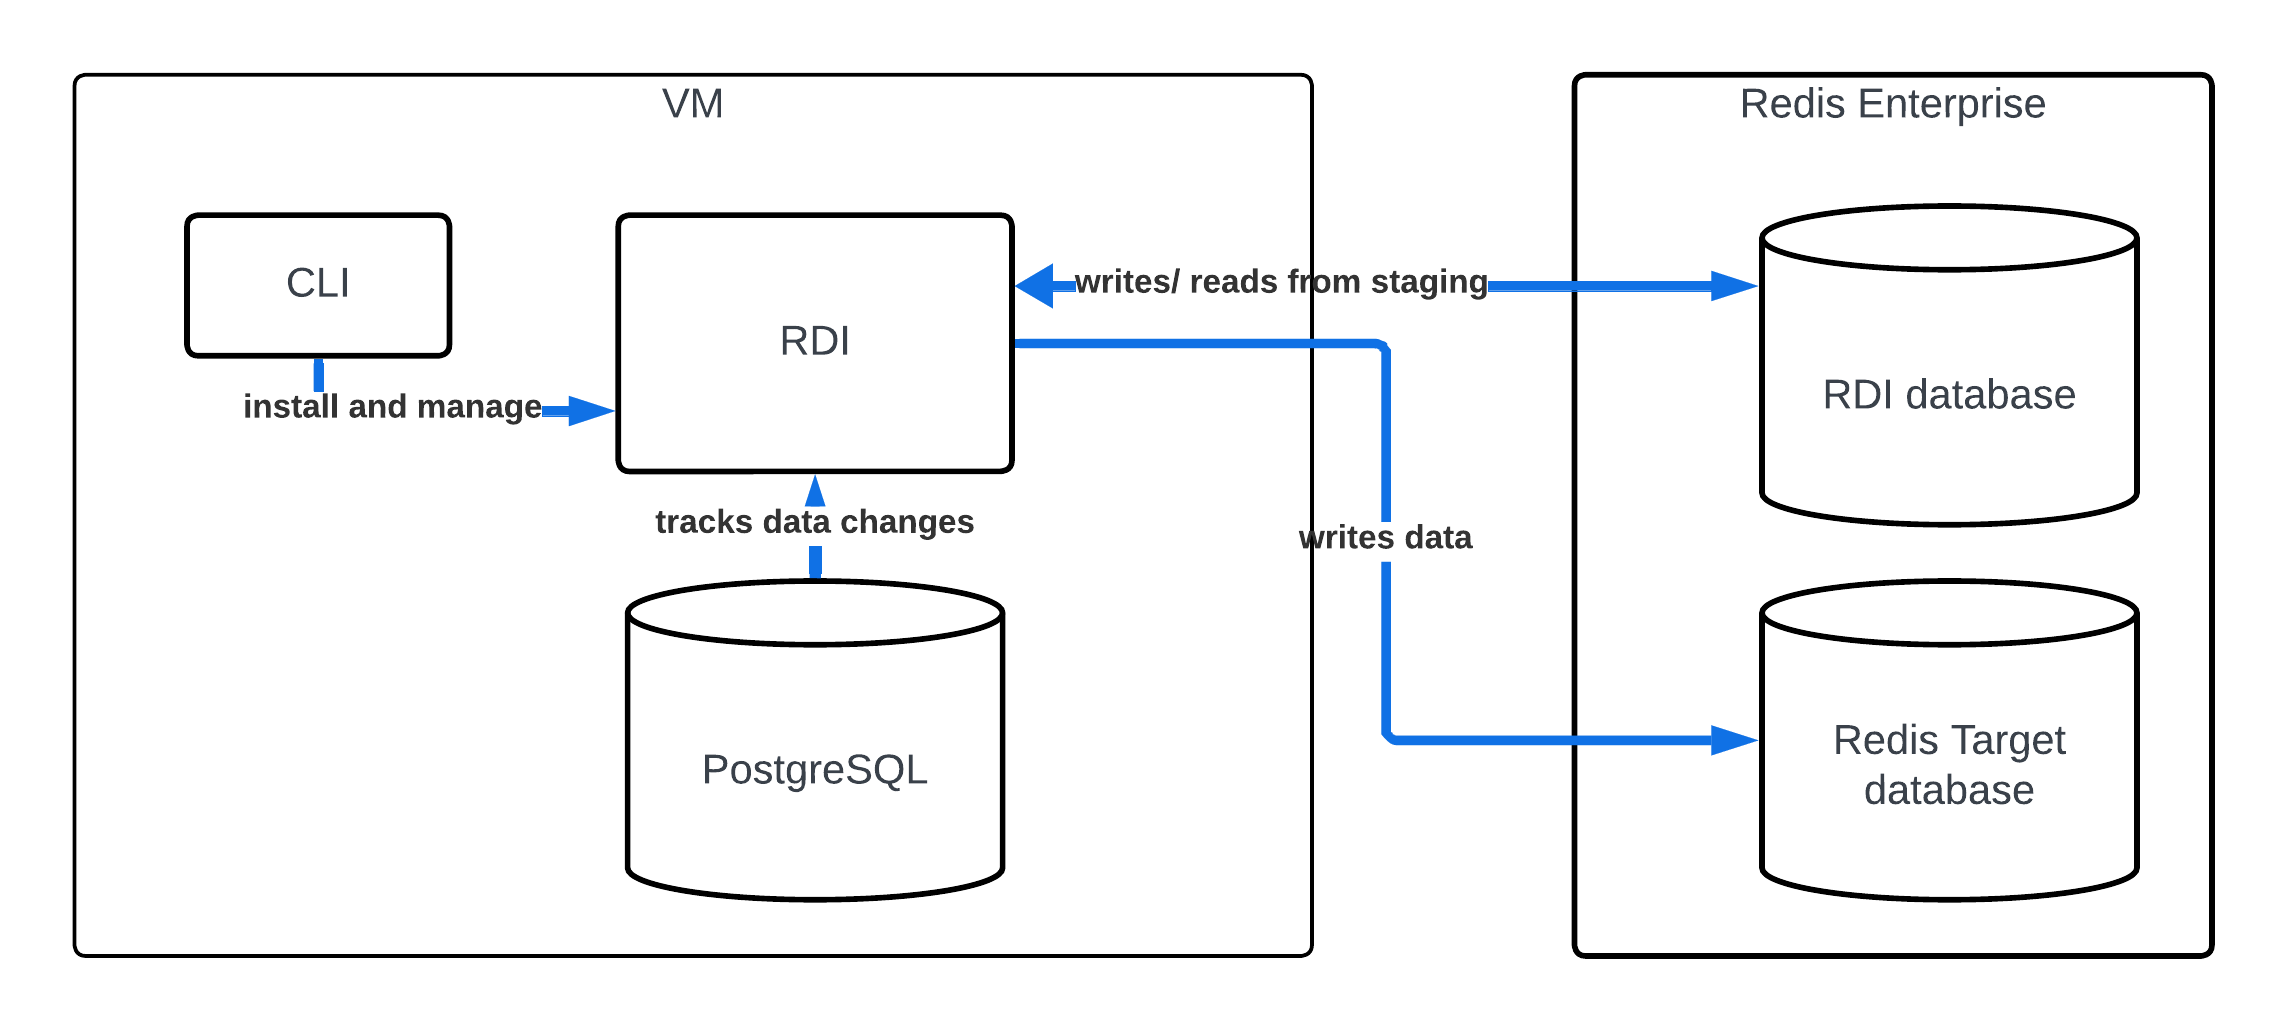
在这里,RDI 收集器跟踪 PostgreSQL 中的更改,并将其写入 Redis 中的 RDI 数据库。然后,流处理器从 RDI 读取数据记录 数据库流式传输、处理它们并将其写入目标。
安装 PostgreSQL
我们为示例 PostgreSQL 提供了一个 Docker 镜像
数据库。按照 Github 页面上的说明下载映像并开始提供数据库。数据库(即
叫chinook具有虚构在线音乐商店的架构和数据
,并且已设置供 RDI 收集器使用。
安装 RDI
按照 VM 安装指南中的说明安装 RDI。
RDI 将在/opt/rdi/config.稍后在准备要部署的管道时,您将需要此路径名
(请参阅下面的准备管道)。
在安装结束时,RDI CLI 将提示您设置访问密钥 对于源 PostgreSQL 数据库和 Redis RDI 数据库。RDI 需要这些 运行管道。
使用 Redis 控制台创建具有以下要求的 RDI 数据库:
-
具有 125MB RAM 的单分片数据库对于快速入门来说已经足够了,但这是两倍 设置为 250MB(如果要添加副本)。
-
为安装提供所需的 RDI 数据库详细信息。
-
将数据库的逐出策略设置为
noeviction.请注意,您不能使用rladmin, 因此,您必须使用管理 UI 或使用以下 REST API 命令来执行此作:curl -v -k -d '{"eviction_policy": "noeviction"}' \ -u '<USERNAME>:<PASSWORD>' \ -H "Content-Type: application/json" \ -X PUT https://<CLUSTER_FQDN>:9443/v1/bdbs/<BDB_UID> -
Set the database's data persistence to AOF - fsync every 1 sec. Note that you can't set this using
rladmin, so you must either do it using the admin UI or with the following REST API commands:curl -v -k -d '{"data_persistence":"aof"}' \ -u '<USERNAME>:<PASSWORD>' \ -H "Content-Type: application/json" -X PUT https://<CLUSTER_FQDN>:9443/v1/bdbs/<BDB_UID> curl -v -k -d '{"aof_policy":"appendfsync-every-sec"}' \ -u '<USERNAME>:<PASSWORD>' \ -H "Content-Type: application/json" \ -X PUT https://<CLUSTER_FQDN>:9443/v1/bdbs/<BDB_UID> -
Ensure that the RDI database is not clustered. RDI will not work correctly if the RDI database is clustered, but it is OK for the target database to be clustered.
Prepare the pipeline
During the installation, RDI placed the pipeline templates at /opt/rdi/config.
If you go to that folder and run the ll command, you will see the pipeline
configuration file, config.yaml, and the jobs folder (see the page about
Pipelines for more information). Use Redis Insight to open
the config.yaml file and then edit the following settings:
- Set the
host to localhost and the port to 5432.
- Under
tables, specify the Track table from the source database.
- Add the details of your target database to the
target section.
At this point, the pipeline is ready to deploy.
Create a context (optional)
To manage and inspect RDI, you can use the
redis-di
CLI command, which has several subcommands for different purposes. Most of these commands require you
to pass at least two options, --rdi-host and --rdi-port, to specify the host and port of your
RDI installation. You can avoid typing these options repeatedly by saving the
information in a context.
When you activate a context, the saved values of
--rdi-host, --rdi-port, and a few other options are passed automatically whenever
you use redis-di. If you have more than one RDI installation, you can create a context
for each of them and select the one you want to be active using its unique name.
To create a context, use the
redis-di add-context
command:
redis-di add-context --rdi-host <host> --rdi-port <port> --cluster-host <Redis DB host> --cluster-api-port <Redis DB API port> --cluster-user <Redis DB username> <unique-context-name>
These options are required but there are also a few others you can save, such as TLS credentials, if
you are using them (see the
reference page
for details). When you have created a context, use
redis-di set-context
to activate it:
redis-di set-context <context name>
There are also subcommands to
list
and delete
contexts.
Deploy the pipeline
You can use Redis Insight
to deploy the pipeline by adding a connection to the RDI API
endpoint (which has the same IP address as your RDI VM and uses port 8083) and then clicking the Deploy button. You can also deploy it with the following command:
redis-di deploy --dir <path to pipeline folder>
where the path is the one you supplied earlier during the installation. (You may also need
to supply --rdi-host and --rdi-port options if you are not using a
context as described above.) RDI first
validates your pipeline and then deploys it if the configuration is correct.
Once the pipeline is running, you can use Redis Insight to view the data flow using the
pipeline metrics. You can also connect to your target database to see the keys that RDI has written there.
See Deploy a pipeline
for more information about deployment settings.
View RDI's response to data changes
Once the pipeline has loaded a snapshot of all the existing data from the source,
it enters change data capture (CDC) mode (see the
architecture overview
and the
ingest pipeline lifecycle
for more information
).
To see the RDI pipeline working in CDC mode:
- Create a simulated load on the source database
(see Generating load on the database
to learn how to do this).
- Run
redis-di status --live
to see the flow of records.
- User Redis Insight to look at the data in the target database.
On this page